Floor Markings and Pictures to Show Where Every Item Belongs
Paint lines and item photos directly on the concrete so each tool, cart, and container has a clear, visible home.
- Creator
 WillytheMinimalist
- Company
- Tennessee Cheesecake
- Wastes
When items have no fixed location, workers waste time searching, and it is unclear whether something is missing or out of place.
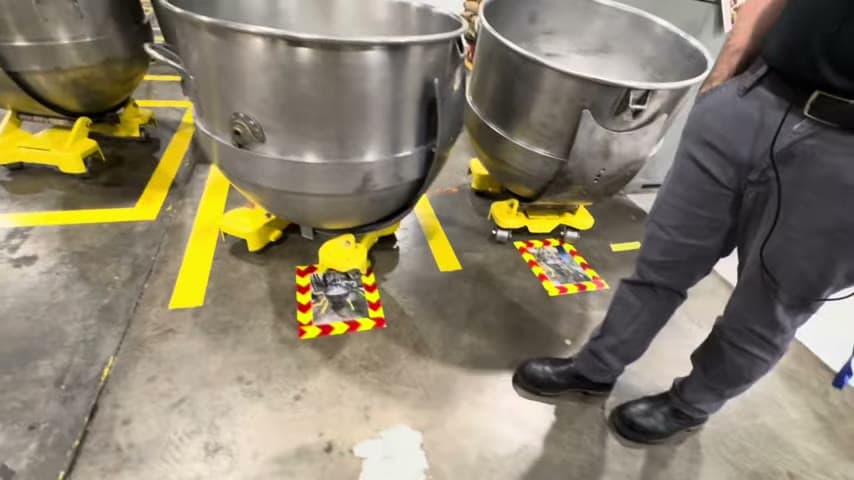
The team painted lines and pictures onto the concrete floor showing exactly what belongs in each spot, giving every item a defined home.
A place for everything and everything in its place: make the correct location visible so anyone can see it at a glance.
What is a Floor Markings and Pictures to Show Where Every Item Belongs?
Floor marking with lines and pictures is a visual control that assigns a designated home to items on a shop floor. Painted outlines define the footprint, and photos or labels on the concrete show exactly what goes where.
It is a core part of 5S, specifically Set in Order (seiton) and Sustain. Instead of relying on memory or verbal knowledge, the standard is built into the environment itself.
The R&D department in this facility took the same idea further by making brackets to hang hoses off the floor, so even cables and hoses have a defined home rather than being coiled up or left underfoot.
The result is a floor where anyone, including a newcomer, can see at a glance where an item belongs and whether it is missing.
Why it works
Painting the standard onto the floor turns one person's knowledge of the correct layout into a shared, permanent reference everyone can use.
- The correct location is captured visually, so it survives staff turnover and shift changes.
- A missing or misplaced item is obvious because an empty painted outline shows what should be there.
- New workers learn the layout instantly instead of asking or guessing.
- Pictures remove ambiguity about which item belongs in which spot.
How to create this idea
- 1Decide the home for each item
Agree with the team on where each cart, container, and tool should live based on how it is used.
- 2Outline the footprint
Paint lines on the concrete around each item's location to define its exact footprint.
- 3Add a picture or label
Mark the floor with a photo or clear label of what goes in that spot, like the cheesecake round holder example shown.
- 4Get items off the floor where possible
Make simple brackets to hang hoses and cables so they have a home instead of being coiled or laid on the floor.
- 5Sustain the standard
Reset items to their marked homes at the end of each shift and refresh faded paint as needed.
Best used when
- shared floor space
- carts and containers
- high item variety
- frequent staff turnover
Less useful when
- items that never move
- very small work areas
- layouts still changing often
Products and tools mentioned
- floor marking tape: Durable adhesive tape used to mark aisles, work zones, and storage boundaries.
- hose bracket: Wall or machine bracket used to store and organize hoses neatly.
Tags
- Problem
- searchingclutterno home
- Lean methods
- 5Svisual controlset in order
- Application
- shop floorstoragematerial handling
Captured from WillytheMinimalist at Tennessee Cheesecake in the video "Tennessee Cheesecake Lean Tour", at 00:08:26. On Lean Toolbox. Watch the original video on YouTube ↗